Authentication Using Fingerprint in Android

Android phones contain fingerprint authentication. We can implement fingerprint authentication in our app to secure our application. We will take a look at the implementation of fingerprint authentication.let's take example of mobile application development. 

Step-By-Step Implementation

Ste​p​ 1: Create a new project in Android or you can use an already created project.  


or 


Step 2: Add dependency of razor pay in build.gradle file on Gradle scripts>Build.gradle app module and add the below dependenc​ies.


 implementation (libs.androidx.biometric)
 //add latest version of biometric

Step 3: Add permission to the internet in app> Androidmanifest.xml file and below code.


 <uses-permission android:name="android.permission.USE_BIOMETRIC"  />


Step 4: Create an activity_main.xml file in the layout folder.


<?xml version="1.0" encoding="utf-8"?>

<LinearLayout

xmlns:android="http://schemas.android.com/apk/res/android"

xmlns:tools="http://schemas.android.com/tools"

android:layout_width="match_parent"

android:layout_height="match_parent"

android:gravity="center"

android:orientation="vertical"

tools:context=".MainActivity">

<TextView

android:layout_width="wrap_content"

android:layout_height="wrap_content"

android:text="GFG | First App"

android:textColor="#fafafa"

android:textSize="30dp" />

<TextView

android:layout_width="wrap_content"

android:layout_height="wrap_content"

android:text="Use your fingerprint to login"

android:textColor="#fafafa"

android:textSize="18sp" />

<ImageView

android:layout_width="200dp"

android:layout_height="200dp"

android:layout_marginVertical="20dp"

android:src="@drawable/fingerprint" />

<TextView

android:id="@+id/msgtext"

android:layout_width="wrap_content"

android:layout_height="wrap_content"

android:text=""

android:textSize="18sp" />

<Button

android:id="@+id/login"

android:layout_width="wrap_content"

android:layout_height="wrap_content"

android:layout_marginVertical="20dp"

android:background="#fafafa"

android:text="Login" />

</LinearLayout>


Step 5: Create a MainActivity3.java file in your application.


 import android.annotation.SuppressLint;

 import android.graphics.Color;

 import android.os.Bundle;

 import android.view.View;

 import android.widget.Button;

 import android.widget.TextView;

 import android.widget.Toast;

 import androidx.annotation.NonNull;

 import androidx.appcompat.app.AppCompatActivity;

 import androidx.biometric.BiometricManager;

 import androidx.biometric.BiometricPrompt;

 import androidx.core.content.ContextCompat;

 import java.util.concurrent.Executor;

 public class MainActivity3 extends AppCompatActivity {

@Override

protected void onCreate(Bundle savedInstanceState) {

super.onCreate(savedInstanceState);

setContentView(R.layout.activity_main);


// Initialising msgtext and loginbutton

@SuppressLint({"MissingInflatedId", "LocalSuppress"}) TextView msgtex = findViewById(R.id.msgtext);

@SuppressLint({"MissingInflatedId", "LocalSuppress"}) final Button loginbutton = findViewById(R.id.login);


// and lets check if our user can use biometric sensor or not

BiometricManager biometricManager = androidx.biometric.BiometricManager.from(this);

switch (biometricManager.canAuthenticate()) {


// this means we can use biometric sensor

case BiometricManager.BIOMETRIC_SUCCESS:

msgtex.setText("You can use the fingerprint sensor to login");

msgtex.setTextColor(Color.parseColor("#fafafa"));

break;


// this means that the device doesn't have fingerprint sensor

case BiometricManager.BIOMETRIC_ERROR_NO_HARDWARE:

msgtex.setText("This device doesnot have a fingerprint sensor");

loginbutton.setVisibility(View.GONE);

break;


// this means that biometric sensor is not available

case BiometricManager.BIOMETRIC_ERROR_HW_UNAVAILABLE:

msgtex.setText("The biometric sensor is currently unavailable");

loginbutton.setVisibility(View.GONE);

break;


// this means that the device doesn't contain your fingerprint

case BiometricManager.BIOMETRIC_ERROR_NONE_ENROLLED:

msgtex.setText("Your device doesn't have fingerprint saved,please check your security settings");

loginbutton.setVisibility(View.GONE);

break;

}


Executor executor = ContextCompat.getMainExecutor(this);

// this will give us result of AUTHENTICATION

final BiometricPrompt biometricPrompt = new BiometricPrompt(MainActivity3.this, executor, new BiometricPrompt.AuthenticationCallback() {

@Override

public void onAuthenticationError(int errorCode, @NonNull CharSequence errString) {

super.onAuthenticationError(errorCode, errString);

}


@Override

public void onAuthenticationSucceeded(@NonNull BiometricPrompt.AuthenticationResult result) {

super.onAuthenticationSucceeded(result);

Toast.makeText(getApplicationContext(), "Login Success", Toast.LENGTH_SHORT).show();

loginbutton.setText("Login Successful");

}

@Override

public void onAuthenticationFailed() {

super.onAuthenticationFailed();

}

});

// BIOMETRIC DIALOG

final BiometricPrompt.PromptInfo promptInfo = new BiometricPrompt.PromptInfo.Builder().setTitle("GFG")

.setDescription("Use your fingerprint to login ").setNegativeButtonText("Cancel").build();

loginbutton.setOnClickListener(new View.OnClickListener() {

@Override

public void onClick(View v) {

biometricPrompt.authenticate(promptInfo);

}

 });

 }

 }


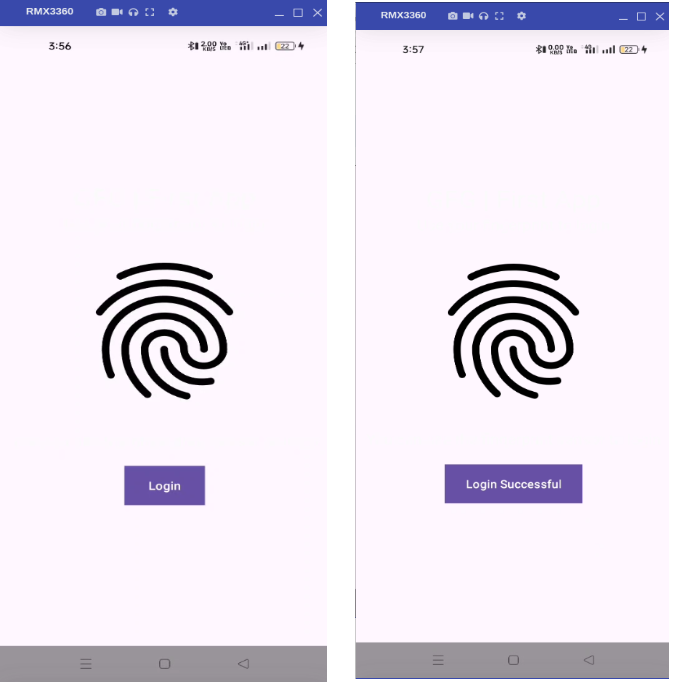
Step 6: Output of Authentication Using Fingerprint.


Happy Coding!

365Bloggy May 7, 2024
Share this post
Tags
SUBSCRIBE THIS FORM


Archive