Floating Action Button with Bottom Navigation Bar in Android

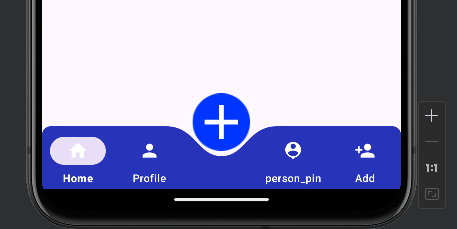
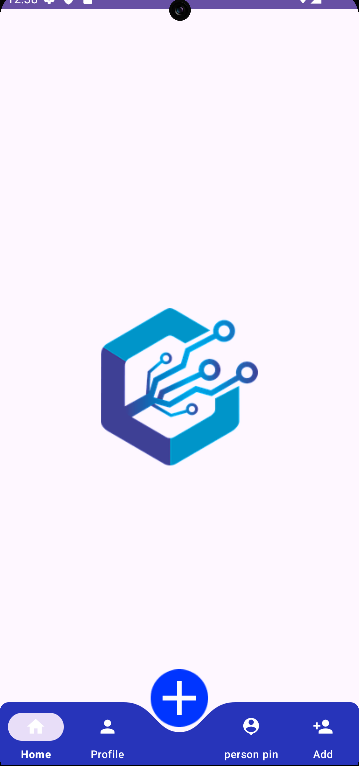
The floating action button differs from typical buttons. Floating action buttons are implemented in the app's UI for primary user activities, and the developer prioritises the actions under the floating action button. Examples include activities such as adding an item to an existing list. Bottom navigation bars allow you to travel between the app's key destinations.

In this article, you will learn how to create your Floating Example of Floating​ in Android. So let’s take example of Floating  activity codes  in Android of Mobile application.  

 Example of Floating


Step-by-Step Im​plementation
​Step 1: Create a New Project in Android ​studio (File >new  project).  
               
Step 2: Create an activity_main.xml file in your layout folder . path (res>layout)
Implement the same in​voke the following code inside activity_main.xml file.   
 <?xml version="1.0" encoding="utf-8"?>
<RelativeLayout xmlns:android="http://schemas.android.com/apk/res/android"
xmlns:app="http://schemas.android.com/apk/res-auto"
xmlns:tools="http://schemas.android.com/tools"
android:layout_width="match_parent"
android:layout_height="match_parent"
android:orientation="vertical"
tools:context=".MainActivity"
tools:ignore="HardcodedText,MissingClass">

<ImageView
android:layout_width="wrap_content"
android:layout_height="wrap_content"
android:layout_centerInParent="true"
android:src="@drawable/company_logo" />

<androidx.cardview.widget.CardView
android:id="@+id/crd"
android:layout_width="match_parent"
android:layout_height="wrap_content"
android:layout_alignParentBottom="true"
android:layout_marginBottom="-8dp"
android:background="@color/transparent"
android:backgroundTint="@android:color/transparent"
app:cardCornerRadius="10dp"
app:cardElevation="0dp"
app:layout_constraintBottom_toBottomOf="parent">

<com.velodate.myapplication.CustomBottomNavigationView1
android:id="@+id/customBottomBar"
android:layout_width="match_parent"
android:layout_height="wrap_content"
android:layout_alignParentBottom="true"
app:itemIconTint="@color/white"
app:itemTextColor="@color/white"
app:labelVisibilityMode="labeled"
app:layout_constraintBottom_toBottomOf="@+id/recyclerView"
tools:ignore="MissingConstraints" />
</androidx.cardview.widget.CardView>

<ImageView
android:id="@+id/img"
android:layout_width="wrap_content"
android:layout_height="wrap_content"
android:layout_above="@+id/crd"
android:layout_centerHorizontal="true"
android:layout_marginBottom="-28dp"
android:background="@drawable/one"
android:src="@drawable/add"
app:layout_constraintBottom_toTopOf="@+id/crd"
app:layout_constraintEnd_toEndOf="parent"
app:layout_constraintStart_toStartOf="parent" />

</RelativeLayout>
Step 3: Create an bottom_menu.xml file in your layout folder . path (res>menu)
Implement the same in​voke the following code inside bottom_menu.xml file.   
 <?xml version="1.0" encoding="utf-8"?>
<menu xmlns:android="http://schemas.android.com/apk/res/android"
xmlns:app="http://schemas.android.com/apk/res-auto">
<item
android:id="@+id/action_favorites"
android:enabled="true"
android:icon="@drawable/home"
android:title="Home"
app:showAsAction="ifRoom"/>
<item
android:id="@+id/action_schedules"
android:enabled="true"
android:title="Profile"
android:icon="@drawable/person"
app:showAsAction="ifRoom"/>
<item
android:enabled="false"
android:title=""
app:showAsAction="ifRoom"/>
<item
android:id="@+id/action_music"
android:enabled="true"
android:icon="@drawable/person_pin"
android:title="person pin"
app:showAsAction="ifRoom"/>
<item
android:id="@+id/action_schedules1"
android:enabled="true"
android:title="Add"
android:icon="@drawable/person_add"
app:showAsAction="ifRoom"/>
</menu>
Step 4: Create an CustomBottomNavigationview1.java file in your package 
Implement the same in​voke the following code inside CustomebottomNavigationView1.xml file. 
 import android.content.Context;
import android.graphics.Canvas;
import android.graphics.Color;
import android.graphics.Paint;
import android.graphics.Path;
import android.graphics.Point;
import android.util.AttributeSet;

import androidx.core.content.ContextCompat;

import com.google.android.material.bottomnavigation.BottomNavigationView;

public class CustomBottomNavigationView1 extends BottomNavigationView {

private Path mPath;
private Paint mPaint;

/** the CURVE_CIRCLE_RADIUS represent the radius of the fab button */
private final int CURVE_CIRCLE_RADIUS = 145 / 2;
// the coordinates of the first curve
private Point mFirstCurveStartPoint = new Point();
private Point mFirstCurveEndPoint = new Point();
private Point mFirstCurveControlPoint1 = new Point();
private Point mFirstCurveControlPoint2 = new Point();

//the coordinates of the second curve
@SuppressWarnings("FieldCanBeLocal")
private Point mSecondCurveStartPoint = new Point();
private Point mSecondCurveEndPoint = new Point();
private Point mSecondCurveControlPoint1 = new Point();
private Point mSecondCurveControlPoint2 = new Point();
private int mNavigationBarWidth;
private int mNavigationBarHeight;

public CustomBottomNavigationView1(Context context) {
super(context);
init();
}

public CustomBottomNavigationView1(Context context, AttributeSet attrs) {
super(context, attrs);
init();
}

public CustomBottomNavigationView1(Context context, AttributeSet attrs, int defStyleAttr) {
super(context, attrs, defStyleAttr);
init();
}

private void init() {
mPath = new Path();
mPaint = new Paint();
mPaint.setStyle(Paint.Style.FILL_AND_STROKE);
mPaint.setColor(ContextCompat.getColor(getContext(), R.color.blue));
setBackgroundColor(Color.TRANSPARENT);
}

@Override
protected void onLayout(boolean changed, int left, int top, int right, int bottom) {
super.onLayout(changed, left, top, right, bottom);

}

@Override
protected void onSizeChanged(int w, int h, int oldw, int oldh) {
super.onSizeChanged(w, h, oldw, oldh);
// get width and height of navigation bar
// Navigation bar bounds (width & height)
mNavigationBarWidth = getWidth();
mNavigationBarHeight = getHeight();
// the coordinates (x,y) of the start point before curve
mFirstCurveStartPoint.set((mNavigationBarWidth / 2) - (CURVE_CIRCLE_RADIUS * 2) - (CURVE_CIRCLE_RADIUS / 3), 0);
// the coordinates (x,y) of the end point after curve
mFirstCurveEndPoint.set(mNavigationBarWidth / 2, CURVE_CIRCLE_RADIUS + (CURVE_CIRCLE_RADIUS / 4));
// same thing for the second curve
mSecondCurveStartPoint = mFirstCurveEndPoint;
mSecondCurveEndPoint.set((mNavigationBarWidth / 2) + (CURVE_CIRCLE_RADIUS * 2) + (CURVE_CIRCLE_RADIUS / 3), 0);

// the coordinates (x,y) of the 1st control point on a cubic curve
mFirstCurveControlPoint1.set(mFirstCurveStartPoint.x + CURVE_CIRCLE_RADIUS + (CURVE_CIRCLE_RADIUS / 4), mFirstCurveStartPoint.y);
// the coordinates (x,y) of the 2nd control point on a cubic curve
mFirstCurveControlPoint2.set(mFirstCurveEndPoint.x - (CURVE_CIRCLE_RADIUS * 2) + CURVE_CIRCLE_RADIUS, mFirstCurveEndPoint.y);

mSecondCurveControlPoint1.set(mSecondCurveStartPoint.x + (CURVE_CIRCLE_RADIUS * 2) - CURVE_CIRCLE_RADIUS, mSecondCurveStartPoint.y);
mSecondCurveControlPoint2.set(mSecondCurveEndPoint.x - (CURVE_CIRCLE_RADIUS + (CURVE_CIRCLE_RADIUS / 4)), mSecondCurveEndPoint.y);

mPath.reset();
mPath.moveTo(0, 0);
mPath.lineTo(mFirstCurveStartPoint.x, mFirstCurveStartPoint.y);

mPath.cubicTo(mFirstCurveControlPoint1.x, mFirstCurveControlPoint1.y,
mFirstCurveControlPoint2.x, mFirstCurveControlPoint2.y,
mFirstCurveEndPoint.x, mFirstCurveEndPoint.y);

mPath.cubicTo(mSecondCurveControlPoint1.x, mSecondCurveControlPoint1.y,
mSecondCurveControlPoint2.x, mSecondCurveControlPoint2.y,
mSecondCurveEndPoint.x, mSecondCurveEndPoint.y);

mPath.lineTo(mNavigationBarWidth, 0);
mPath.lineTo(mNavigationBarWidth, mNavigationBarHeight);
mPath.lineTo(0, mNavigationBarHeight);
mPath.close();
}

@Override
protected void onDraw(Canvas canvas) {
super.onDraw(canvas);
canvas.drawPath(mPath, mPaint);
}
}
Step 5: Create an MainActivity.kt file in your package folder .

Implement the same invoke the fol​low​ing code inside MainActivity.kt file.

 import android.annotation.SuppressLint
import android.os.Bundle
import android.view.View
import android.widget.ImageView
import android.widget.Toast
import androidx.appcompat.app.AppCompatActivity


class MainActivity : AppCompatActivity() {
@SuppressLint("MissingInflatedId")
override fun onCreate(savedInstanceState: Bundle?) {
super.onCreate(savedInstanceState)
setContentView(R.layout.activity_main)
val customBottomNavigationView1 =
findViewById<CustomBottomNavigationView1>(R.id.customBottomBar)
customBottomNavigationView1.inflateMenu(R.menu.bottom_menu)
val img = findViewById<View>(R.id.img) as ImageView
img.setOnClickListener {
Toast.makeText(this@MainActivity, "Okay", Toast.LENGTH_SHORT).show()
}
}
}

Step 6 : Output of above example.


Happy coding!

365Bloggy July 24, 2024
Share this post
Tags
SUBSCRIBE THIS FORM


Archive