How to Generate Barcode in Android?

Barcodes are pictorial representations of data that allow for easy scanning. When we want to include this feature into Android applications for a variety of purposes, we must first understand the basic principles and procedures involved in properly creating barcodes.

In this article, you will learn how to create your barcodes widget in Android. So let’s take exmple of barcodes  in Android of Mobile application.
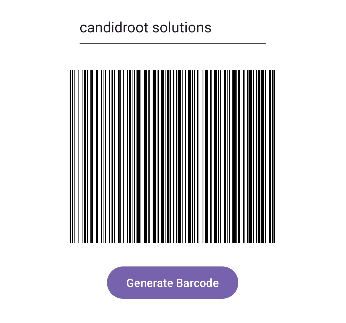
 Example of barcodes


 Step-by-Step Implementation
 Step 1: Create a New Project in Android S​tudio (File >new  project). 


  Step 2: Create an activity_main.xml file in your layout folder . path (res>layout)

   Implement the same in​voke the following code inside activity_main.xml file. 

 <?xml version="1.0" encoding="utf-8"?>
<androidx.constraintlayout.widget.ConstraintLayout
xmlns:android="http://schemas.android.com/apk/res/android"
xmlns:app="http://schemas.android.com/apk/res-auto"
xmlns:tools="http://schemas.android.com/tools"
android:layout_width="match_parent"
android:layout_height="match_parent"
android:background="@color/white">

<EditText
android:id="@+id/et1"
android:layout_width="239dp"
android:layout_height="57dp"
android:layout_marginTop="184dp"
android:hint="Enter Text"
android:textColorHint="@color/black"
app:layout_constraintEnd_toEndOf="parent"
app:layout_constraintStart_toStartOf="parent"
app:layout_constraintTop_toTopOf="parent" />

<ImageView
android:id="@+id/img1"
android:layout_width="292dp"
android:layout_height="214dp"
tools:layout_editor_absoluteX="76dp"
tools:layout_editor_absoluteY="285dp"
app:layout_constraintTop_toBottomOf="@id/et1"
android:layout_marginTop="25dp"
app:layout_constraintStart_toStartOf="parent"
app:layout_constraintEnd_toEndOf="parent"/>

<Button
android:id="@+id/btn1"
android:layout_width="wrap_content"
android:layout_height="wrap_content"
app:layout_constraintTop_toBottomOf="@id/img1"
android:layout_marginTop="25dp"
app:layout_constraintStart_toStartOf="parent"
app:layout_constraintEnd_toEndOf="parent"
android:text="Generate Barcode"
/>

</androidx.constraintlayout.widget.ConstraintLayout>
Step 3: Create an MainActivity.kt file in your package folder .

Implement the same invoke the fol​lowing code inside MainActivity.kt file.

 import android.graphics.Bitmap
import android.graphics.Color
import android.os.Bundle
import android.widget.Button
import android.widget.EditText
import android.widget.ImageView
import android.widget.Toast
import androidx.appcompat.app.AppCompatActivity
import com.google.zxing.BarcodeFormat
import com.google.zxing.MultiFormatWriter


class MainActivity : AppCompatActivity() {
private lateinit var et: EditText
private lateinit var bt: Button
private lateinit var img: ImageView
override fun onCreate(savedInstanceState: Bundle?) {
super.onCreate(savedInstanceState)
setContentView(R.layout.activity_main)

et = findViewById(R.id.et1)
bt = findViewById(R.id.btn1)
img = findViewById(R.id.img1)

bt.setOnClickListener {
genBarcode()
}

}

private fun genBarcode() {
val inputValue = et.text.toString().trim()

if (inputValue.isNotEmpty()) {
val mwriter = MultiFormatWriter()

try {
val matrix =
mwriter.encode(inputValue, BarcodeFormat.CODE_128, img.width, img.height)

val bitmap = Bitmap.createBitmap(img.width, img.height, Bitmap.Config.RGB_565)

for (i in 0 until img.width) {
for (j in 0 until img.height) {
bitmap.setPixel(i, j, if (matrix[i, j]) Color.BLACK else Color.WHITE)
}
}

img.setImageBitmap(bitmap)
} catch (e: Exception) {

Toast.makeText(this, "Exception $e", Toast.LENGTH_SHORT).show()
}
} else {
et.error = "Please enter a value"
}
}
}
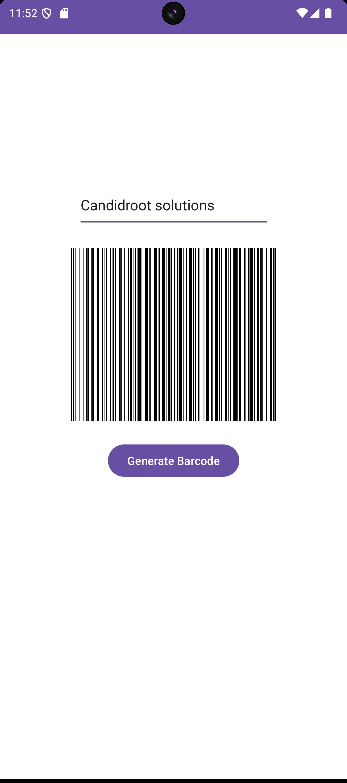
Step 4 : Output of above example.


Happy coding!

365Bloggy July 16, 2024
Share this post
Tags
SUBSCRIBE THIS FORM


Archive