How to Implement OTP View in Android?

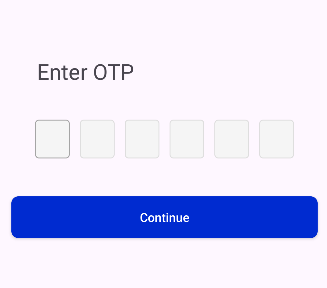
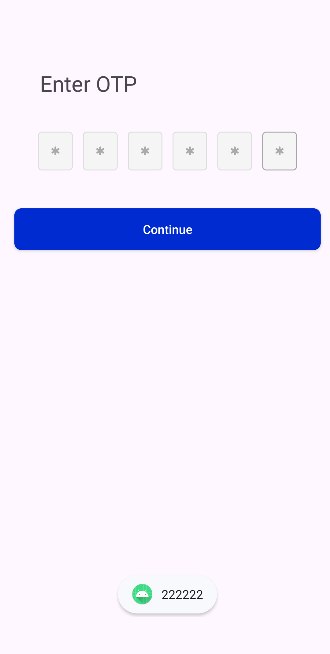
An OTP View or PinView in Android is a widget that allows users to enter their PIN, OTP, and so on. They are primarily used for two-factor authentication or phone number verification via OTP.

In this article, you will learn how to create your PinView  Example of PinView​ in Android. So let’s take example of PinView  activity codes  in Android of Mobile application.  

Example of Pinview


Dependency of  PinView 

   implementation(group = "com.github.appsfeature", name = "otp-view", version = "1.1")

 Properties of country code 

  • box_margin: This propertie used to set margin of pinview.
  • hide_otp: This propertie used to hide or visible on the pinview.
  • lenght: This propertie used to lenght of pinview.
  • hide_otp_drawable: set backgound of pin view.
Step-by-Step Im​plementation
​Step 1: Create a New Project in Android ​studio (File >new  project). 


Step 2: Create an activity_main.xml file in your layout folder . path (res>layout)

Implement the same in​voke the following code inside activity_main.xml file.

 <?xml version="1.0" encoding="utf-8"?>
<androidx.constraintlayout.widget.ConstraintLayout xmlns:android="http://schemas.android.com/apk/res/android"
xmlns:app="http://schemas.android.com/apk/res-auto"
xmlns:tools="http://schemas.android.com/tools"
android:layout_width="match_parent"
android:layout_height="match_parent"
android:orientation="vertical"
tools:context=".MainActivity"
tools:ignore="HardcodedText">

<TextView
android:id="@+id/textView"
android:layout_width="wrap_content"
android:layout_height="wrap_content"
android:layout_marginStart="8dp"
android:layout_marginTop="84dp"
android:text="Enter OTP"
android:textSize="25sp"
app:layout_constraintStart_toStartOf="@+id/otp_view"
app:layout_constraintTop_toTopOf="parent" />

<com.otpview.OTPTextView
android:id="@+id/otp_view"
android:layout_width="wrap_content"
android:layout_height="wrap_content"
android:layout_marginTop="33dp"
android:textColor="@android:color/black"
app:box_margin="6dp"
app:height="45dp"
app:hide_otp="true"
app:hide_otp_drawable="@drawable/bg_otp_box_hide"
app:layout_constraintEnd_toEndOf="parent"
app:layout_constraintStart_toStartOf="parent"
app:layout_constraintTop_toBottomOf="@+id/textView"
app:length="6"
app:otp=""
app:otp_box_background="@drawable/bg_otp_box"
app:otp_box_background_active="@drawable/bg_otp_box_active"
app:otp_box_background_error="@drawable/bg_otp_box_error"
app:otp_box_background_inactive="@drawable/bg_otp_box_inactive"
app:otp_box_background_success="@drawable/bg_otp_box_success"
app:otp_text_size="20sp"
app:width="40dp" />

<androidx.appcompat.widget.AppCompatButton
android:id="@+id/btnotp"
android:layout_width="match_parent"
android:layout_height="wrap_content"
android:layout_margin="20dp"
android:layout_marginStart="16dp"
android:layout_marginTop="36dp"
android:background="@drawable/round_corner_border"
android:text="@string/continue_"
android:textAllCaps="false"
android:textColor="@color/white"
app:layout_constraintStart_toStartOf="parent"
app:layout_constraintTop_toBottomOf="@+id/otp_view" />


</androidx.constraintlayout.widget.ConstraintLayout>


Step 3: Create an MainActivity.kt file in your package folder .

Implement the same invoke the fol​low​ing code inside MainActivity.kt file.

 import android.annotation.SuppressLint
import android.os.Bundle
import android.view.View
import android.widget.Toast
import androidx.appcompat.app.AppCompatActivity
import androidx.appcompat.widget.AppCompatButton
import com.otpview.OTPTextView

class MainActivity : AppCompatActivity() {
@SuppressLint("MissingInflatedId")
override fun onCreate(savedInstanceState: Bundle?) {
super.onCreate(savedInstanceState)
setContentView(R.layout.activity_main)
val btnotp = findViewById<View>(R.id.btnotp) as AppCompatButton
val otpview = findViewById<View>(R.id.otp_view) as OTPTextView
btnotp.setOnClickListener {
Toast.makeText(this@MainActivity, otpview.otp, Toast.LENGTH_SHORT).show()
}

}
}

Step 4 : Output of above example.


Happy coding!

365Bloggy July 22, 2024
Share this post
Tags
SUBSCRIBE THIS FORM


Archive