OctoImage Widget-Flutter

To display images in an application, the Flutter OctoImage widget needs an ImageProvider. A Place holder or a Progress indication for loading the image can be added to the OctoImage widget's images. The Octosets, which are essentially an imagebuilder, error, and predetermined placeholder combo, are utilised by an OctoImage widget.

In this article, you will learn how to create your Octolmage widget in Flutter. So let’s take Octolmage example of the Table  in Flutter of Mobile application.

There are two type of Octolmage widget in Flutter.


Syntax

Octolmage One :

 OctoImage(
image: NetworkImage(
'Image URL'),
errorBuilder: OctoError.icon(color: Colors.blue),
fit: BoxFit.cover,
)

 Octolmage Two:   

 OctoImage.fromSet(
fit: BoxFit.cover,
image: NetworkImage(
'IMAGE URL',
),
octoSet: OctoSet.circleAvatar(
backgroundColor: Colors.green,
text: Text("Not Found Image"),
),
)

Step-by-Step Implementation

Step 1: Create a New Project in Android Studio (File >new flutter project). 


Step 2: Adding material package 

Import method the runApp method in the main function call first while run the application. 

 import 'package:flutter/material.dart';

 void main() {

     runApp(RunMyApp());

 }

Step 3: Creating a stateless widget   

We can create a stateless widget that contains MaterialApp widget,AppBar,etc.

 class RunMyApp extends StatelessWidget {

     const RunMyApp({super.key});  

    @override

    Widget build(BuildContext context) {

    return MaterialApp(home);O

     }

 }

Step 4: Below code write a Octolmage in a Flutter.
 Widget exampleOne() {
return AspectRatio(
aspectRatio: 269 / 173,
child: OctoImage(
image: NetworkImage(
'https://dfstudio-d420.kxcdn.com/wordpress/wp-content/uploads/2019/06/digital_camera_photo-980x653.jpg'),
errorBuilder: OctoError.icon(color: Colors.blue),
fit: BoxFit.cover,
),
);
}

Widget exampleTwo() {
return SizedBox(
height: 200,
child: OctoImage.fromSet(
fit: BoxFit.cover,
image: NetworkImage(
'https://i.pinimg.com/564x/f6/1a/5f/f61a5f7e90f0ba4f3eda751f6ebdc6f46.jpg',
),
octoSet: OctoSet.circleAvatar(
backgroundColor: Colors.green,
text: Text("Not Found Image"),
),
),
);
}
Step 5: Final code of Octolmage.
 import 'package:flutter/material.dart';
import 'package:octo_image/octo_image.dart';

void main() {
runApp(OctolImage());
}

class OctolImage extends StatefulWidget {
const OctolImage({Key? key}) : super(key: key);
@override
_MyHomePageState createState() => _MyHomePageState();
}

class _MyHomePageState extends State<OctolImage> {
@override
Widget build(BuildContext context) {
return Scaffold(
appBar: AppBar(
title: const Text("OctoImage Demo"),
),
body: Column(
mainAxisAlignment: MainAxisAlignment.spaceAround,
children: <Widget>[
exampleOne(),
exampleOne(),
],
),
);
}
}


Widget exampleOne() {
return AspectRatio(
aspectRatio: 269 / 173,
child: OctoImage(
image: NetworkImage(
'https://dfstudio-d420.kxcdn.com/wordpress/wp-content/uploads/2019/06/digital_camera_photo-980x653.jpg'),
errorBuilder: OctoError.icon(color: Colors.blue),
fit: BoxFit.cover,
),
);
}

Widget exampleTwo() {
return SizedBox(
height: 200,
child: OctoImage.fromSet(
fit: BoxFit.cover,
image: NetworkImage(
'https://i.pinimg.com/564x/f6/1a/5f/f61a5f7e90f0ba4f3eda751f6ebdc6f46.jpg',
),
octoSet: OctoSet.circleAvatar(
backgroundColor: Colors.green,
text: Text("Not Found Image"),
),
),
);
}
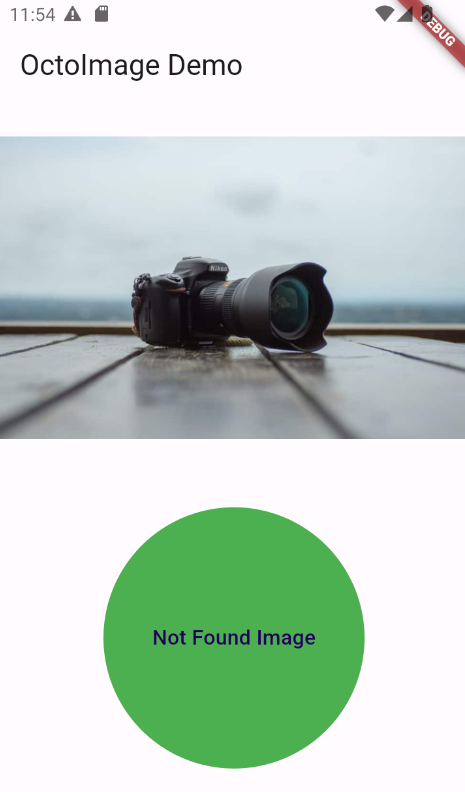
Step 6: Output of above example.


Happy coding!

365Bloggy June 17, 2024
Share this post
Tags
SUBSCRIBE THIS FORM


Archive